(3) 反応機構 その2
2014-12-20
2025-02-01
本稿は chemfig v1.66 をもとにしています。
今回は実際の例を書いてみましょう。
その前に、前回の記事では書いていなかった anchor について触れておきます。
\chemmove でのノードの指定の際、 controls の基準位置 (anchor) を変更できます。
\draw(a.anchor1)..controls +(90:5mm) and +(90:5mm)..(b.anchor2);
例えば a.90 はノード a の 90 度の位置、つまりノード a の上辺の中央となります。
次の図での赤、青、緑、黒 はそれぞれ 0, 30, 60, 90 度を指定した場合です。
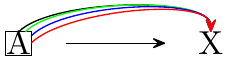
\schemestart
\fboxsep0pt
\fbox{\chemfig{@{a}A}} \arrow \chemfig{@{x}X}
%
\chemmove{
  \foreach \w/\c in {90/black, 60/green, 30/blue, 0/red} {
    \draw[color=\c](a.\w)..controls +(45:5mm) and +(90:5mm)..(x);
  }
}
\schemestop
角度だけではなく、
\draw(a.north east)..controls +(90:5mm) and +(90:5mm)..(b);
のように north 等を使った指定もできます。
これらのアンカーの指定は、上付きの記号などから矢印を出したいときに重宝するかもしれません。
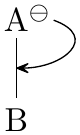
\schemestart
\chemfig{@{a}A\rlap{$^\ominus$}-[@{b}:-90]B}
%
\chemmove{
  \draw[shorten <=8pt](a.30)..controls +(-20:8mm) and +(0:5mm)..(b);
}
\schemestop
実際に反応機構を書く際には、
- 原則
controlsで調整 - それだけでは難しい場合に anchor を併用
とすると良いのではないかと思います。
さて、 chemfig による反応機構の記述例として、ベンズアルデヒドとアセトフェノンからのベンザルアセトフェノンの生成を書いてみました。 面倒なので、ノード名は重複しています。
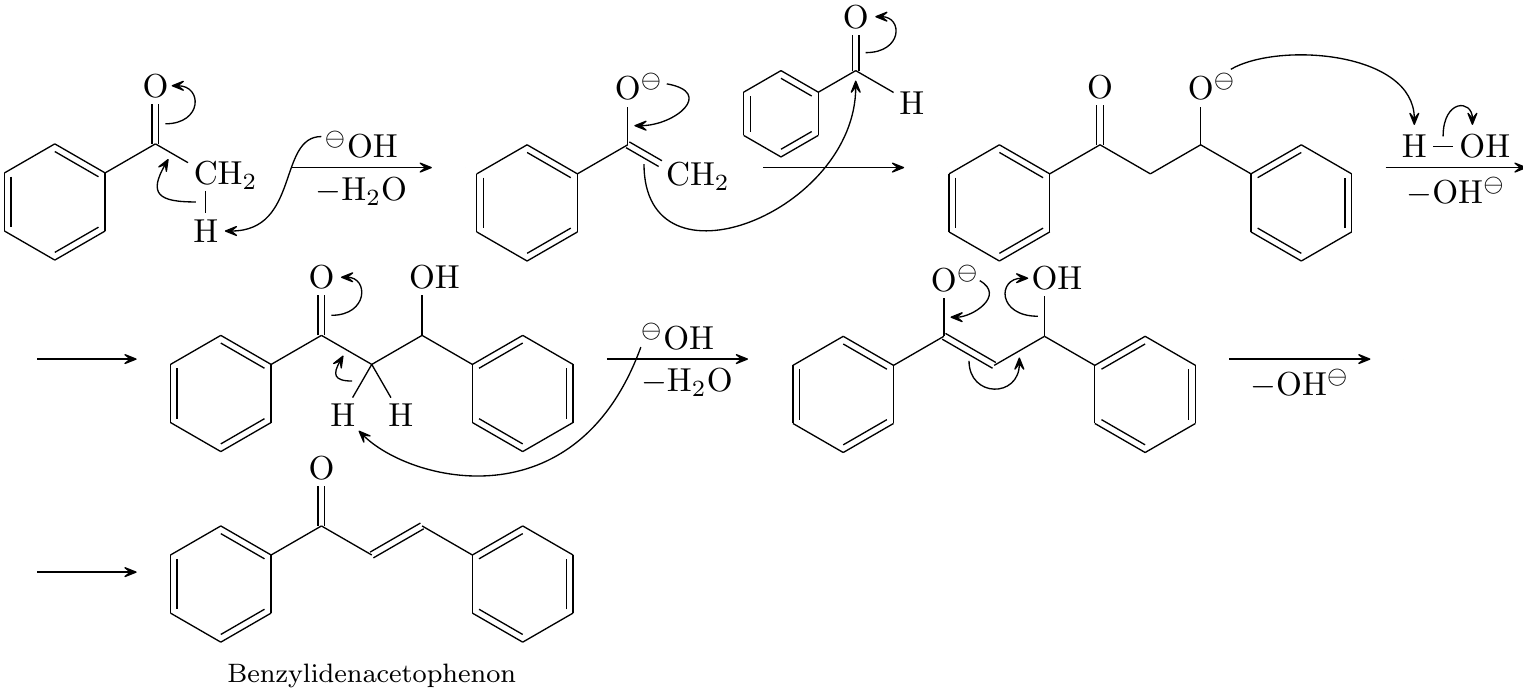
\setchemfig{atom sep=1.75em,arrow coeff=1.25}

\schemestart
\chemfig{*6(-=-(-(=[@{db}:90]@{O}O)-[@{sb}::-60]CH_2(-[@{Hsb}:-90]@{H}H))=-=)}
\arrow{->[\chemfig{@{e}^\ominus OH}][$-$\chemfig{H_2O}]}
%
\chemmove{
  \draw[shorten <=1pt,shorten >=2pt](e.145)..controls +(-180:5mm) and +(0:10mm)..(H);
  \draw[shorten <=3pt,shorten >=2pt](Hsb)..controls +(180:5mm) and +(-120:5mm)..(sb);
  \draw[shorten <=3pt,shorten >=1pt](db)..controls +(0:5mm) and +(0:5mm)..(O);
}
%%
\chemfig{*6(-=-(-(-[@{sb}:90]@{e}O\rlap{$^\ominus$})=[@{db}::-60]CH_2)=-=)}
\arrow{->[\chemfig[atom sep=1.3em]{*6(-=-(-@{carb}(=[@{db2}:90,1.25]@{O}O)-[:-30,1.5]H)=-=)}]}
%
\chemmove{
  \draw[shorten <=8pt,shorten >=2pt](e.30)..controls +(-10:8mm) and +(0:5mm)..(sb);
  \draw[shorten <=3pt,shorten >=3pt](db)..controls +(-90:15mm) and +(-90:15mm)..(carb);
  \draw[shorten <=3pt,shorten >=2pt](db2)..controls +(0:5mm) and +(0:5mm)..(O);
}
%%
\chemfig{*6(-=-(-(=[@{db}:90]O)-[@{sb2}::-60]-[::+60](-[:90]@{e}O\rlap{$^\ominus$})-[::-60]*6(-=-=-=))=-=)}
\arrow{->[\chemfig{@{wH}H-[@{wsb}]@{wO}OH}][$-$\chemfig{OH^\ominus}]}
%
\chemmove{
  \draw[shorten <=6pt,shorten >=3pt](e.30)..controls +(30:8mm) and +(90:10mm)..(wH);
  \draw[shorten <=3pt,shorten >=3pt](wsb)..controls +(90:5mm) and +(90:5mm)..(wO);
}
\schemestop
\par
\schemestart
\arrow[,1]
\chemfig{*6(-=-(-(=[@{db}:90]@{O}O)-[@{sb}::-60]
  (-[@{Hsb}:-120]@{H}H)(-[:-60]H)
  -[::+60](-[:90]OH)-[::-60]*6(-=-=-=))=-=)}
\arrow{->[\chemfig{@{e}^\ominus OH}][\hspace{2mm}$-$\chemfig{H_2O}]}[,1.25]
%
\chemmove{
  \draw[shorten <=0pt,shorten >=2pt](e.-135)..controls +(-110:20mm) and +(-45:10mm)..(H);
  \draw[shorten <=3pt,shorten >=2pt](Hsb)..controls +(180:3mm) and +(-120:3mm)..(sb);
  \draw[shorten <=3pt,shorten >=2pt](db)..controls +(0:5mm) and +(0:5mm)..(O);
}
%
\chemfig{*6(-=-(-(-[@{Osb}:90]@{O}O\rlap{$^\ominus$})=[@{db}::-60]
  -[@{sb}::+60](-[@{OHsb}:90]@{OH}OH)-[::-60]*6(-=-=-=))=-=)}
\arrow{->[][$-$\chemfig{OH^\ominus}]}[,1.25]
%
\chemmove{
  \draw[shorten <=8pt,shorten >=2pt](O.40)..controls +(-30:6mm) and +(0:3mm)..(Osb);
  \draw[shorten <=3pt,shorten >=2pt](db)..controls +(-90:5mm) and +(-90:5mm)..(sb);
  \draw[shorten <=2pt,shorten >=1pt](OHsb)..controls +(180:5mm) and +(180:5mm)..(OH);
}
\schemestop
\par
\schemestart
\arrow[,1]
\chemname{\chemfig{*6(-=-(-(=[:90]O)-[::-60]=[::+60]-[::-60]*6(-=-=-=))=-=)}}{\footnotesize Benzylidenacetophenon}
\schemestop
所要時間は計りませんでしたが、たぶん一時間以上かかったと思います。 私自身も不慣れで練習しながら書いている (さらに酒も入っていた ;-) )、ということを差し引いても時間がかかりすぎです。 正直なところ、 chemfig で反応機構を書くのはあんまりおすすめできません。